Introduction to M-Files
- What is M-Files?
- What is Metadata?
- Intro to the M-Files Interface
- Accessing M-Files
- M-Files Terminology
How to Save Documents
How to Find Documents
- Finding Information with Metadata
- How to Use Quick Search
- Organizing with Views
- How to Use Views
- How to Use the Pinned Tab
How to Modify & Collaborate on Documents
Beyond Basics
- Grouping Information
- Creating Views in M-Files
- Search Options
- How To Create Document Collections
- How to Create Multifile Documents
- How To Create Relationships Between Objects
Tips and Tricks

Creating Views in M-Files
Creating your own personal views is a great way to categorize and sort information in a way that’s relevant to you.
This lesson explains the basics of how you can create a view using simple metadata filters, operators, and grouping levels.
Please note that to create a view, you must know your vault’s metadata structure. The metadata you see in the examples here will vary from your vault.
Not Sure What A View Is? Check Out These Guides First.

Organizing with Views
Views are a favorite features among M-Filers all over the globe. They look and feel like folders but they are way better. Learn more about what they are, how they work, and how they'll benefit you.

How to Use Views
Views are saved searches. Browsing and accessing documents through views make up a heavy part of using M-Files every day.
Creating Basic Views
The Building Blocks of a View
When building a view, it’s important to think thoroughly about what you want to see in the view, like “I want to see all documents related to our customer, A & A consulting.”
Then you have to define a view filter.
To build a filter, you have to think of the metadata in your vault.
View filters are based off of metadata properties and values.
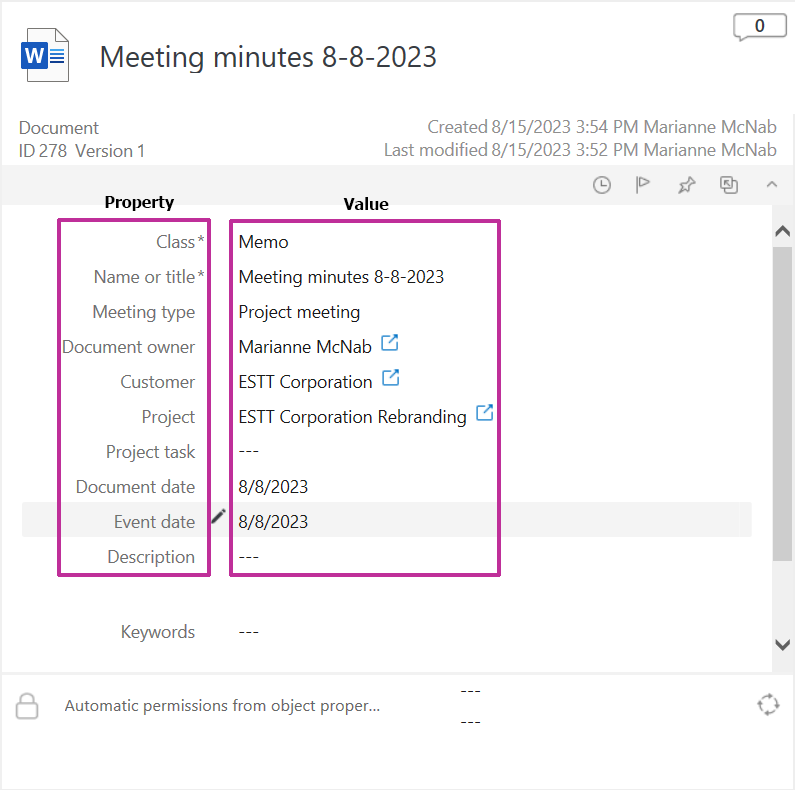
Below are some examples of simple view filters:
- Class = Proposal
- Customer = A & A Consulting
- Created by = me
We recommend browsing through your vault to see what sort of metadata properties and values you could use to create your views filters.
How to Create a View
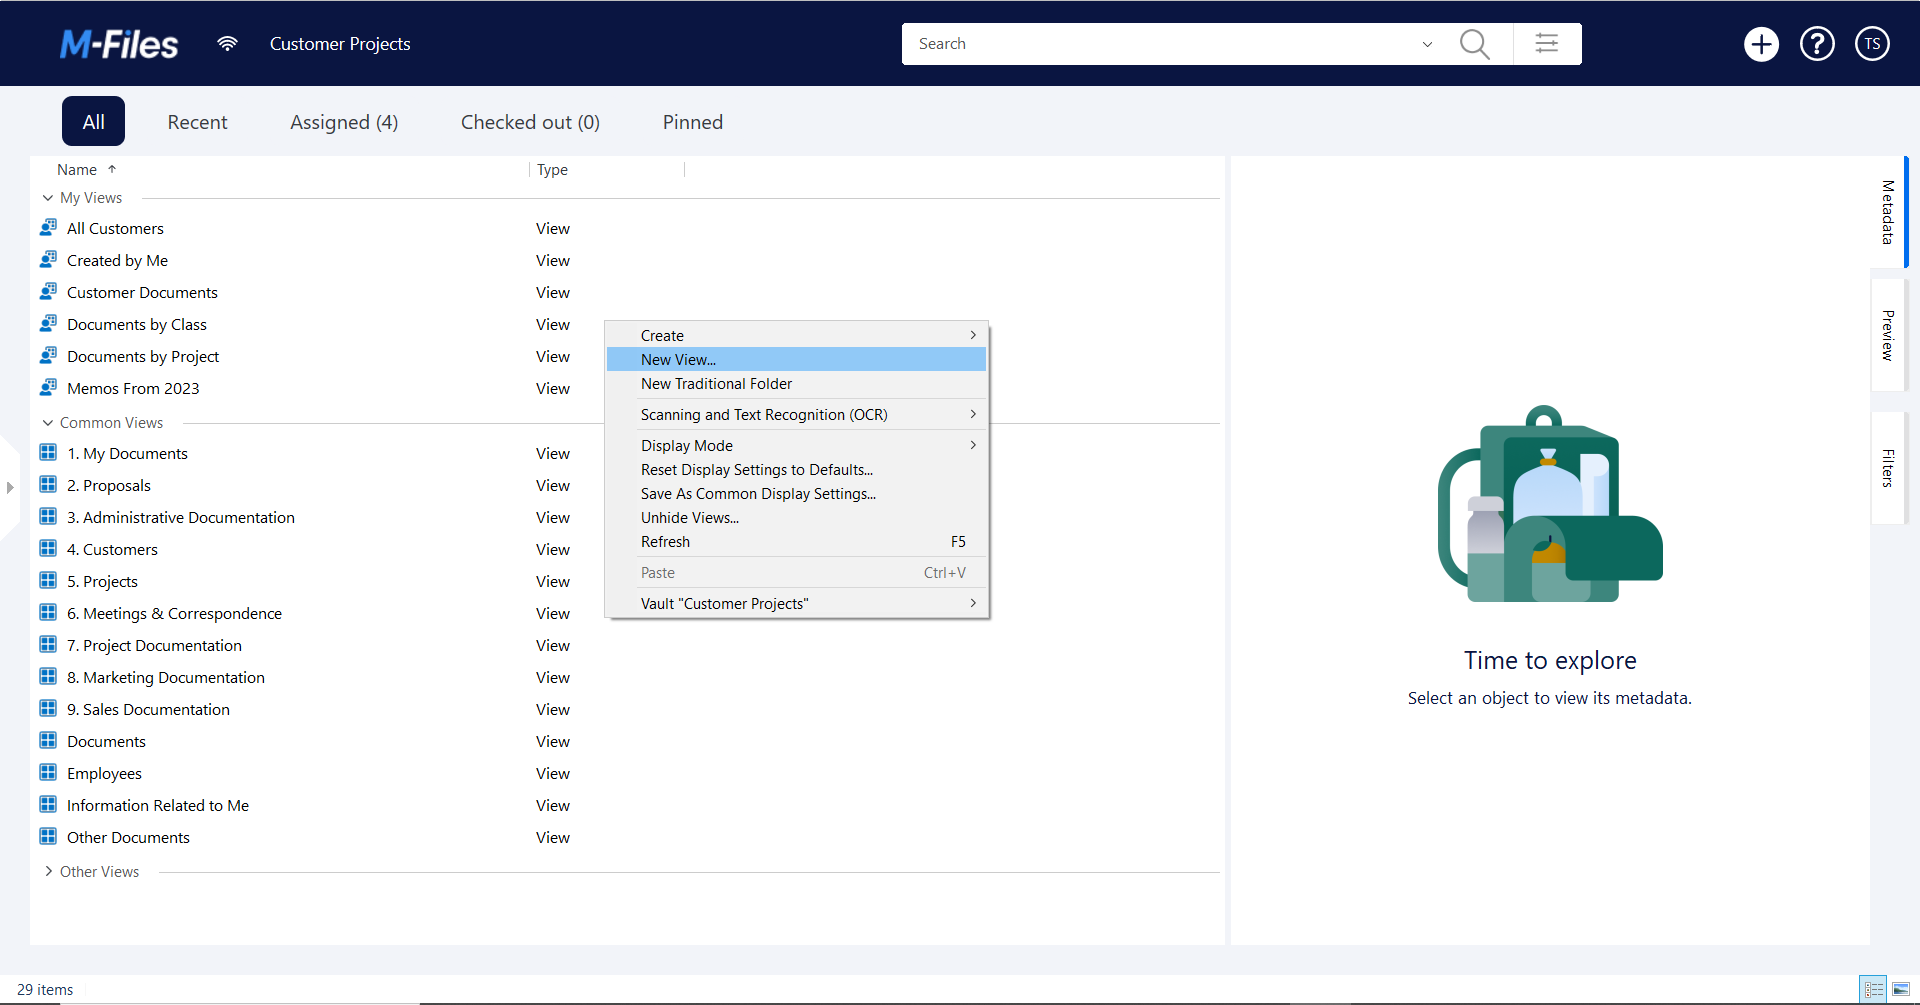
To create a view, all you need to do is to right-click on an empty area in your vault, and choose New View.
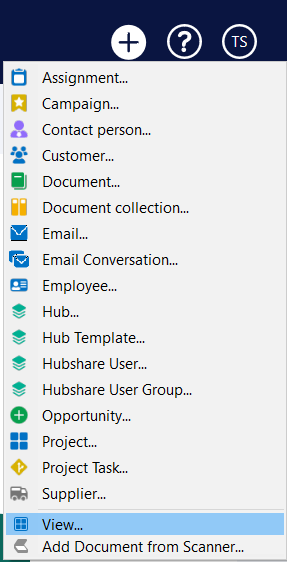
You can also create views via the Create menu.
The View Creation Dialog
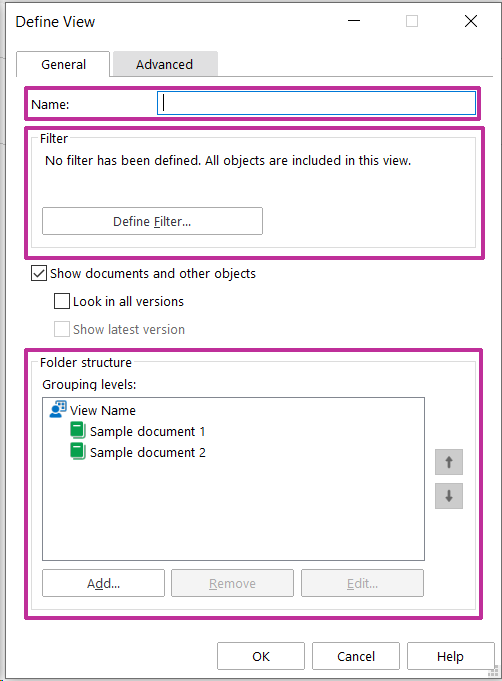
When you create a view, you’ll be greeted with the dialog you see below.
The most notable settings in the dialog are Name, Filter, and Grouping levels.
All you need to create a view is a name and a filter.
You can find more information and guidance on these areas further down in the guide.
The Name field is where you can specify a name for your view.
The Filter option is where you define the metadata filter for the view.
And the Grouping levels area is where you can add structure to your views, but this is optional.
Naming Your View – Best Practices
As a best practice, name your view so that it’s very clear what sort of information you’ll find when you click that view.
The name will be displayed in the listing area, but it does not act as a filter for the documents you want to see in your view.
Good examples of view names:
- Project Documents | Austin District Redevelopment | A&A Consulting
- Documents Created by Me
- Project Document Templates
Bad examples of view names:
- Documents
- Miscellaneous
- Customer Stuff
Defining View Filters
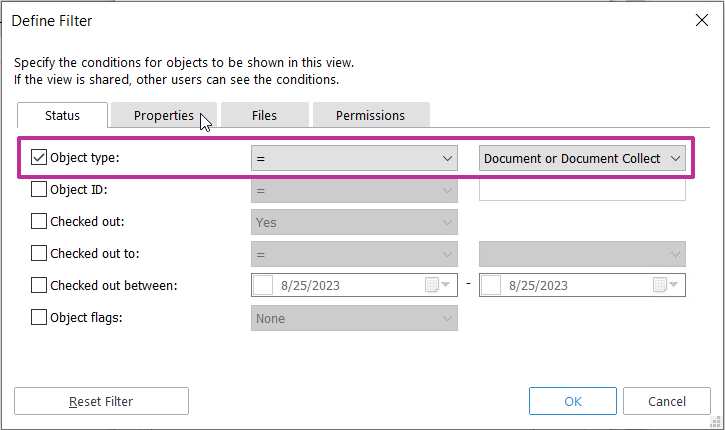
The Define Filter dialog is where you tell M-Files what you want to see in this view.
As a best practice, it’s best to be specific to avoid having too many objects in your view.
On the Status tab, you can specify the object type that you want to see in your view.
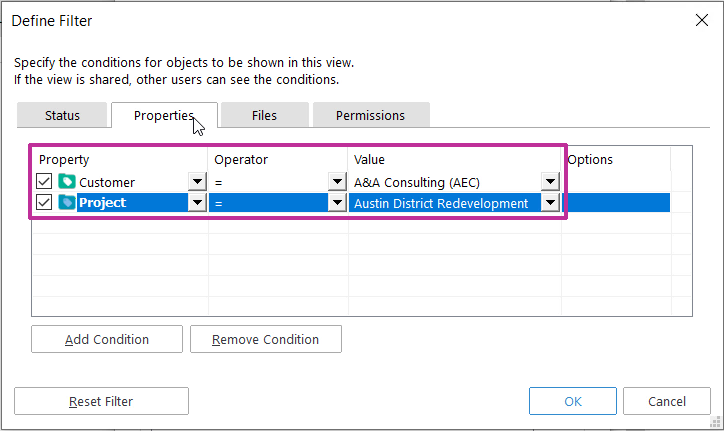
On the Properties tab, you create the main filters, using metadata properties and values.
Once you have the name and the filter ready, the filtered documents will appear in your view.
Example 1
You can tell M-Files, for instance, that you want to see all documents related to the customer, A&A Consulting.
As a filter, this would look like:
- Object Type = Document or Document Collection
- Customer = A&A Consulting
Example 2
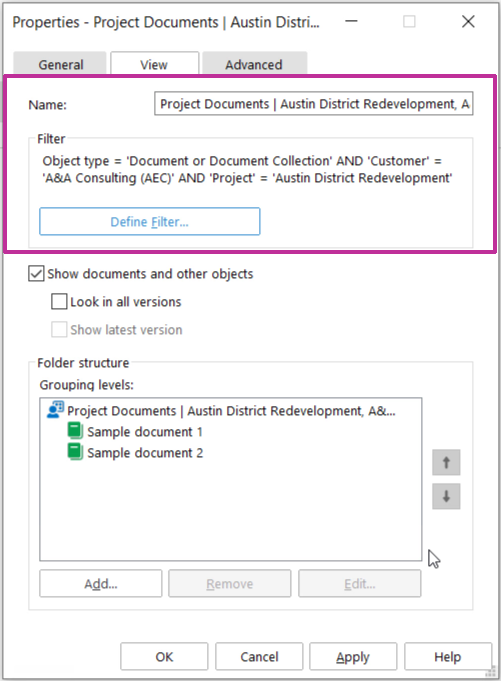
For any view, you can use multiple filters. For instance, let’s say that you want to narrow the previous view even further to show documents related to the customer, A&A Consulting, and their Austin District Redevelopment project. Here’s what that filter would look like:
- Object Type = Document or Document Collection
- Project = Austin District Redevelopment
- Customer = A&A Consulting
In the image and video below, you can see the completed view with all the filters used in the examples above. So whenever someone clicks this view, M-Files will browse through the vault and pull up all objects that meet all of the filter criteria.
Adding Columns to Views
Columns are another great way of organizing documents and other objects in your view.
You can add columns by right-clicking the columns area and scrolling through the list of properties to show in your view.
The example below shows columns for Customer and Project.
Removing Columns in Views
To remove columns from your view, just right-click the column you want to get rid of and select Remove this column.
Creating Advanced Views
Once you’ve mastered the basics of building a view, you can start making use of more advanced features, like modifying operators and adding grouping levels.
Operators expand your filter options.
Grouping levels allow you to add more structure to your view.
The sections below offer guidance and demonstrations of both features.
Using Operators
In the examples above, we covered how you can create a view using a simple filter where a property must have a certain value, such as Class = Project Plan.
When creating a view, the operator is automatically set to equal to. However, by modifying the operator in that filter you can unlock more filter options.
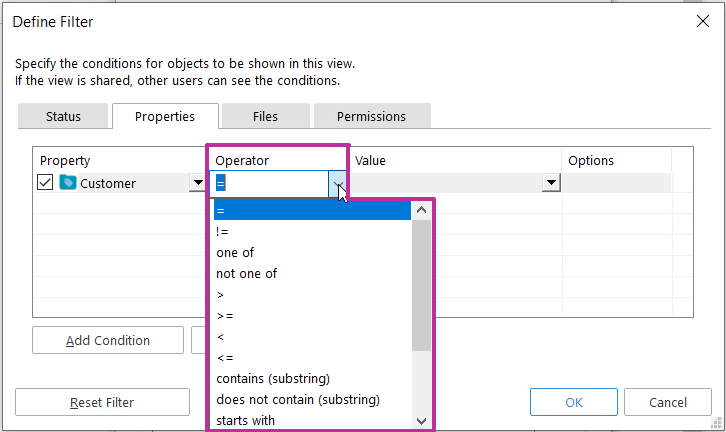
For instance, instead of equal to, you can use operators like, one of, is not empty, and so forth.
Some typical views using alternative operators could be:
- Documents related to a specific list of customers
- Contracts that are about to expire
- Documents created by me within the last month
Example 1
The example below shows documents related to a specific list of customers and illustrates the use of the one of operator. The filter of the view is:
- Object type = Document or Document Collection
- Customer is one of A&A Consulting, Forney Nolte Associations, ESTT corporation
Note: If you’re wondering why the filter is not the following:
- Customer = A&A Consulting
- Customer = Forney Nolte Associations
- Customer = ESTT corporation
This is because, as we explain in the section below on common mistakes, these filters would cancel each other out, because when you click this view, M-Files would have to find objects that meet all these criteria at the same time.
Example 2
The example view below shows contracts that are set to expire within the next 60 days, using the less than operator. The filter of the view is:
- Class = Contract or Agreement
- Effective Through is less than 60 days to
Example 3
The example view below shows documents created by me within the past 30 days, using the less than operator. The filter of the view is:
- Created by = Dell Clayton
- Created is less than 30 days from
Operator Options
There are many options when it comes to operators. Below is a list of the operator options, an explanation of what they do, and some examples of how you can use them.
| = | Equal to | The most common operator to be used when creating views. It’s also the default operator. |
| != | Is unequal to | Use this to filter objects that may have different values for a certain property. For example, you want to see all documents created by your team members. To filter documents you add the condition Object Type = Document. And to get only those created by your team members you add condition Created by one of Tina; Norman; Max; Monica; Marcel; Jenna. You can select multiple values from the list by holding down the key Ctrl. |
| One of | Use this to filter objects that may have different values for a certain property. For example, you want to see all documents created by your team members. To filter documents, you add the condition Object Type = Document. And to get only those created by your team members you add the condition Created by one of Tina; Norman; Max; Monica; Marcel; Jenna. You can select multiple values from the list by holding down the Ctrl key. | |
| Not one of | With this operator, you get to exclude multiple values at once. For example, you can filter all memos (Class = Memo) created by everyone else but your team (created by not one of Tina; Norman; Max; Monica; Marcel; Jenna). | |
| > >= < <= | Greater than, Greater than or equal to, Less than, Less than or equal to | Excellent operators to use with numbers and dates. For example, you can use these to filter all contracts that are about to expire within the next 30 days, as long as the expiration date is filled in as metadata. To create such a view, you need to filter contracts (Class = Contract) and add the condition Expiration date <= 30, and make sure to change the option from nothing to Days to. |
| Contains (Substring) and Does not contain (Substring) | Excellent operators when the values of a property can be typed in instead of choosing from a list or you can’t remember the complete value. For example, if you want to be filtering based on the information typed in the Description field. | |
| Starts with and Does not start with | Use these operators when you want to filter based on the start of the value instead of the full value. For example,e you can have multiple customer names starting in the same way but having different endings such as M-Files Corporation, M-Files Oy and M-Files Gmbh. | |
| Matches wildcard pattern and Does not match wildcard pattern | Use these operators when you want to use wildcards such as *, ? or # when defining the value you want to base your filtering on. | |
| Is empty and Is not empty | Excellent operators when performing information management maintenance tasks. For example, you want to filter all meeting memos without the event date filled in to gently remind the creators to pay attention to it the next time. To filter these, you need the conditions Class = Memo and Event date is empty. |
Grouping Levels
Grouping levels give you the possibility of adding additional structure to your view.
When you add a grouping level to a view, you tell M-Files to group the listed objects by specific criteria, like class, customer, creation date, and so forth.
Adding grouping levels is a great option when your view lists too many results.
Adding a Grouping Level
You can add grouping levels to your views when creating a new view or by opening the properties of an existing view.
It’s good to start with a simple grouping, and then advance to more complex cases if they are necessary.
It’s good to keep in mind that having the right number of levels can be helpful yet having too many can reduce efficiency.
Example 1
One of the most common properties used in grouping levels is Class, which is demonstrated in the first example.
Example 2
The example below demonstrates grouping a view by the Customer property.
Example 3
The example below demonstrates grouping a view by the Project property.
Deleting Grouping Levels
Grouping levels can be removed via the view properties dialog.
Common Mistakes When Creating a View
Here you can find some common mistakes that might occur when creating a view:
Creating a View Within a View
Creating a view within a view is a very common mistake.
This often happens when you are in the vault looking for stuff and navigating through views, and then you create a new view within a view.
If you create a view within a view, the filter of the first view will affect what will be seen in the second view. There’s actually nothing wrong with creating views within views, but it’s good to keep this in mind.
Backward Metadata Filter
Another really common mistake, especially when it comes to building views for the first time, is to build the metadata filter backwards.
After looking for the metadata to use in your view, you might be really focused in remembering the value, instead of the whole metadata filter, and thus start building the filter with value first.
It might be beneficial to say the metadata filter out loud, for instance: “I want to see all documents where the class is proposal”.
This might help identify the whole condition where a property must have a certain value, instead of just the value.
Multiple Filters Cancelling Each Other Out
The last example of the common mistakes is using multiple filters that clash with each other.
For example, let’s say you want a view that pulls up both contracts and proposals. So, you build a view with the following filter:
- Class = Proposal
- Class = Contract
Then when you click that view, nothing appears. This is because M-Files is looking for objects that meet all that criteria and there aren’t any objects with two classes.
The proper filter in this case would use an alternative operator.
- Class is one of Proposal; Contract.
As a best practice, it’s always best to test your views.
FAQ
Got Questions?
The metadata and filters shown in the examples are specific to the vault we use. Your company’s metadata structure and vault in general will most likely be completely different. To learn about your company’s metadata structure, please contact your M-Files business administrator.
To create a common view, you need administrative rights. If you need a common view, please reach out to your company’s M-Files business or IT administrator.
Yes. Views can be shared via email, and other means, just like objects in M-Files.
You might have accidentally created a view inside of a view, or your filters might cancel out each other. See the section above on common mistakes.
Creating a personal view is requires intermediate proficiency in M-Files. This is because to create your own views, you must first understand your vault’s metadata structure.
Try the following if you’re still struggling with creating your own personal views:
- Ask your organization’s administrator for help and guidance.
- Review your vault’s metadata structure. You can do this by review the object types in the Create Menu, the classes available on the metadata card, and the metadata properties under each class. Understanding your own vault is a prerequisite to building your own views.
- Review how a common view has been configured for reference. Simply right-click the common view > Properties > View Filter. Under the Status and Properties tab, you can see how the common view has been configured.
- Take the Advanced & Super User course in M-Files Academy. You may have access to M-Files Academy as part of your organization’s M-Files subscription. In the Advanced & Super User course, there’s a comprehensive views module with interactive exercises to help you learn how to create your own views. Discuss this option with your organization’s administrator or reach out to the M-Files Academy team at [email protected] to check subscription status.
