Getting Started
- What is M-Files?
- What is Metadata?
- The M-Files Way to Collaborate
- Accessing M-Files
- How to Save Documents
- How to Use Quick Search
- How to Modify Documents
- How to Share Documents
- Organizing with Views
- How to Use Views
- How to Use the Pinned Tab
M-Files Products
- Introduction to M-Files Mobile Application
- Introduction to M-Files Hubshare
- Introduction to M-Files for Microsoft Teams
- Introduction to M-Files Aino AI Assistant
- Introduction to Desktop Co-Authoring in M-Files
Beyond Basics
- Search Options
- Creating Views in M-Files
- Grouping Information
- How To Create Document Collections
- How to Create Multi-File Documents
- How To Create Relationships Between Objects
Tips and Tricks
- How to Create and Complete Assignments
- How to Create Notifications in M-Files
- How to Use and Create Document Templates
- How To Use Offline Mode in M-Files
- How to Change the Default Check-In Functionality
- How to Use Workflows in M-Files
- Permissions in M-Files
- How to Convert Documents to PDF Format
- How to Avoid Creating Duplicate Content in M-Files
- How to Co-Author Documents with Office 365

How to Change the Default Check-In Functionality
M-Files helps you in many ways in your daily work, and checking in documents is one of these ways. In this guide, we’ll walk you through the process of changing the default Check-In functionality to have M-Files either check in documents automatically or leave them checked out for you.
Document Checkout and Check-In
Here’s a quick refresher on checking documents in and out.
If you need to modify document content, you first need to check the document out.
You can double-click the document and M-Files will ask if you want to check out the document for editing or open it in the read-only mode.
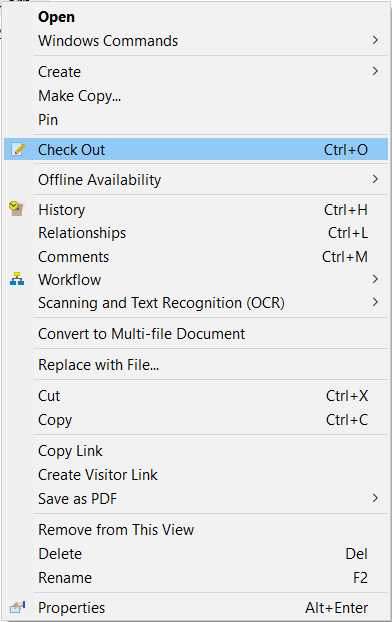
Alternatively, you can right-click the document and choose Check Out from the context menu.

After you’ve made your changes, you can close the program you were using to modify it and M-Files will ask if you want to check in the document.
Alternatively, if your company has Microsoft Office in use, you can check the document back in via the M-Files Ribbon.

Only by checking in the document, will your changes be visible to other M-Files users.
Changing the Default Check-In Functionality
By changing the check-in settings, you can have M-Files check in documents automatically, or leave them checked out to you after modifying them.
To do this, you need to navigate to the User-specific Settings.
You can find these settings in M-Files by pressing Alt on your keyboard, and then selecting Settings > M-Files Desktop Settings > Settings > User-specific Settings.
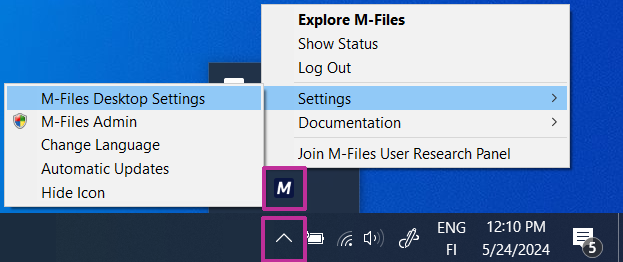
Another way to find these settings is to right-click the M-Files Icon in the system tray and select M-Files Desktop Settings > Settings > Settings > User-specific Settings.

With the Behavior at file close settings, you can
- have M-Files check in documents automatically
- leave them checked out to you after making modifications and without the check-in dialog appearing
- or you can have the dialog appear and choose what M-Files will do after a certain amount of time if no user input is made.
A good practice is to have M-Files check in documents after making modifications in case other users need to make changes to them.
